Painting kitchen cabinets is the single highest-ROI cosmetic upgrade in any home. Unfortunately, most homeowners commonly do it wrong, which causes the paint to peel within 18 months and costs more to fix than a professional refinish. Learning how to paint kitchen cabinets correctly is beneficial because a fresh coat of paint on cabinetry may offer transformation instead of a full cabinet replacement at a fraction of the cost.
You can learn everything about cabinetry painting from cleaning and prep through primer selection, color trends, paint application, and long-term care. It helps you make the right call whether you are planning a DIY weekend project or evaluating whether to hire a professional cabinet painter in Bellevue, WA. For Bellevue homeowners who require a professional-grade result without the DIY risk, Kitchen Remodel Bellevue WA provides professional cabinet painting and refinishing as a standalone service.
Skip the DIY Risk, Get Professional Cabinet Painting in Bellevue
Kitchen Remodel Bellevue WA offers a factory-smooth spray finish on your kitchen cabinets with proper prep, professional-grade paint, and reliable workmanship.
Get an in-home estimate from our licensed in-house team with No obligation.
Get a Cabinet Painting Estimate (425) 696-7060Table of Contents
Is Painting Kitchen Cabinets Worth It?
It’s important to understand whether painting the specific cabinets is the right choice and what you can realistically expect before picking up a brush. A professional cabinet refinish may cost $3,500 to $7,500 for an average kitchen. DIY costs approximately $200 to $400 in materials, takes 3 to 5 days of waiting, and proper prep makes it look identical to new cabinets.
Full cabinet replacement is still more expensive than painting. New cabinets, demolition, disposal, and installation may lead to the five-figure range even for a modest kitchen. New cabinet hardware, countertops, and trades add up to the total expenses. Cabinet painting and refinishing offer clear value to homeowners.
When Painting Cabinets Makes Sense
Learning how to paint a kitchen cabinet makes sense for homeowners who are looking to save money by refinishing the existing cabinets. It is an ideal option for homeowners who want to learn how to paint kitchen cabinets and don’t want to buy new cabinets, which increases their expenses. Here is how painting a cabinet makes sense:
- Cabinet boxes are structurally sound without warping or water damage.
- The existing cabinetry layout works, and you are not planning a full renovation.
- Looking for a high-impact cosmetic transformation without full remodel cost in Bellevue.
- Preparing the home for sale and wanting to maximize buyer appeal.
When Painting Does Not Make Sense
Cabinet box painting doesn’t work well on thermofoil cabinetry that has a white plastic-laminated MDF with a smooth, seamless appearance. Moreover, cabinet paint adhesion is poor, which leads to eventual delamination of the foil. Cabinets with major damage such as swollen MDF from water, drawers off track, and broken hinges require structural repair first. Painting oak kitchen cabinets with heavy grain to make them look smooth may require grain filling before starting the paint, which adds significant effort and time.
Cabinet Materials That Paint Well
Learning how to paint wood kitchen cabinets because wooden cabinetry paints well for kitchens. You can consider grain filler for wood cabinets made from mahogany or oak that provide a smooth surface for painting. MDF or solid wood (birch, cherry, maple, oak) with a sealed or smooth finish, and metal cabinets are beautifully painted with the right prep.
Tools and Materials for Painting Kitchen Cabinets
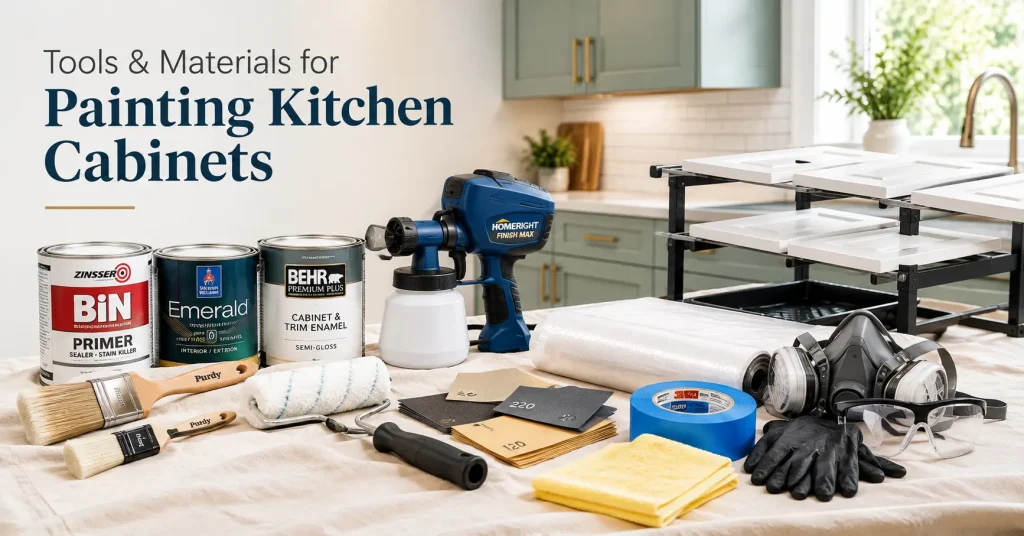
A professional-quality cabinet paint job may require the right tools. Using the wrong kitchen cabinet paint brush vs roller vs sprayer, skipping the tack cloth, or improper ventilation when applying cabinet paint are the most common causes of DIY cabinet painting failure.
Paint and Primer
- Bonding primer includes Zinsser BIN shellac-based or water-based options.
- Cabinet-grade paint consists of Behr Alkyd Semi-Gloss, Sherwin-Williams Emerald Urethane, or Benjamin Moore Advance.
- Paint thinner or water for cleanup, based on the type of paint.
Tools: Brushes, Rollers, and Sprayer
- 4-inch microfiber cabinet paint roller for flat cabinet door surfaces.
- 2-inch sash brush from the Purdy or Wooster brand for detailed areas.
- HVLP sprayer for cabinet painting that includes a HomeRight sprayer or Graco HVLP sprayer for a factory-smooth finish without brush marks.
- Cabinet door painting rack or sawhorses for doors and drawer fronts.
- Door painting stands to hold doors horizontally while painting and drying.
Cleaning and Prep Supplies
- Trisodium Phosphate (TSP) cleaner or a TSP substitute.
- Liquid sandpaper (deglosser) when you are looking for how to paint kitchen cabinets without sanding.
- 220-grit sandpaper to ensure sanding between coats.
- 120-grit sandpaper for the initial scuff sanding.
- Blue painter’s tape such as 3M ScotchBlue.
- Plastic sheeting to safeguard appliances and countertops.
- A tack cloth for cabinet painting removes the dust before each coat of paint.
- Drop cloths to protect kitchen flooring from paint spills and messy drips.
Safety Equipment
- A minimum N95 full-face respirator mask for shellac or oil-based primers.
- Nitrile gloves safeguard your hands from polyurethanes, oil-based paints, and chemical solvents.
- Safety glasses for painting kitchen cabinets DIY offer protection against chemical paint splashes and sanding dust.
- An exhaust fan in a sealed window ensures ideal ventilation to pull dust and fumes safely.
Best Paint for Kitchen Cabinets in 2026
When you’re exploring how to paint kitchen cabinets, choosing the right paint should be your priority. It is important to note that a standard wall paint, even a high-quality wall paint, is not an ideal option for cabinet surfaces. Cabinets often require a paint specified to handle frequent cleaning, resist moisture, cure hard, and hold up to daily contact.
Water-Based Enamel or Alkyd Paint
Water-based alkyd paints, also popular as water-based enamels or waterborne alkyds, are the professional cabinet painting standard. Paints with a satin finish and water-based enamels work smoothly for kitchen cabinets due to the balance of washability, ease of application, and adhesion. Water-based alkyds provide the cabinet paint durability of traditional oil-based paints with lower VOC content, quicker dry time, and easier cleanup. Ideal self-leveling reduces brush marks, provides a washable finish, and cures hard.
Oil-Based Paint
Traditional oil-based vs water-based cabinet paint cures extremely durable and hard, offering a professional standard for cabinetry. The significant drawbacks include the dry time of up to 24 hours between coats, high VOC content that needs serious ventilation, mineral spirits for cleanup, and the finish becoming yellow over time in case of light or white kitchen cabinet paint colors. Water-based alkyd is the best option for every category of cabinet for most Bellevue homeowners.
Latex Paint
A standard latex paint is not recommended for kitchen cabinet painting in Bellevue. It remains soft after drying and doesn’t cure hard enough to withstand repeated cleaning, moisture exposure, and daily contact. You must remember that latex paint on cabinets chips, peels, and scratches within months under normal kitchen use.
Not Sure Which Paint or Method is Right for Your Cabinets?
Kitchen Remodel Bellevue WA assesses your cabinet material, current condition, and goals to recommend the right approach before any work starts.
Access professional consultation and honest guidance with no upsell.
Book a Consultation Call Us TodayTop Kitchen Cabinet Paint Brands in 2026
Sherwin-Williams Emerald Urethane and Benjamin Moore Advance cabinet paint are the two professionally recognized cabinet paints. These are popular options for self-leveling, PEAS-free, and low-VOC when you are looking for how to paint kitchen cabinets.
Benjamin Moore Advance
A water-based alkyd and self-leveling paint brand that offers a full color range and dries to a hard enamel finish. A waterborne paint that offers a durable and factory-smooth finish for the kitchen cabinetry. It offers the professional standard for brush and roller application of kitchen cabinet painting.
Sherwin-Williams Emerald Urethane
A premium water-based hybrid paint for cabinets that offers both excellent hardness and scrubbability. This paint dries quicker than Advance, offering strong adhesion for the kitchen cabinets. Moreover, there is also no need for a bonding primer on the previously painted cabinetry surfaces.
Behr Alkyd Semi-Gloss
A hybrid-based paint formula that is widely available, offering a better painting experience than a standard Behr paint for cabinetry. It is a budget-friendly paint option for homeowners who are cost-conscious about kitchen cabinet paint in Bellevue, Washington. This paint offers a smooth finish with the water cleanup of acrylic when you are considering how to paint kitchen cabinets.
Rust-Oleum Cabinet Transformations
An all-in-one kit choice for smaller kitchens with smooth installation. Your cabinets are trimmed and painted without a hassle. It is important to remember that Rust-Oleum transformations are less durable than professional-grade cabinet paints.
Best Finish: Satin vs Semi-Gloss vs Gloss
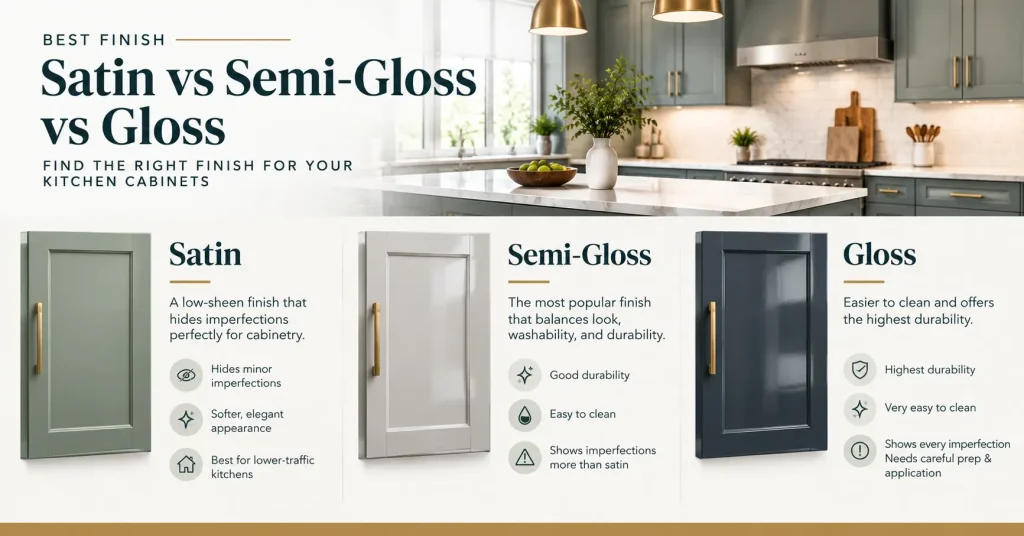
At Kitchen Remodel Bellevue WA, kitchen remodel contractors may use a latex or oil-based paint with a glossy finish for easier cleaning. A cabinet finish can last for 8 to 10 years with the proper prep, high-quality paint, and proper maintenance.
- Satin: A low-sheen finish that hides imperfections perfectly for cabinetry. It is slightly less washable than the semi-gloss finish, offering a softer appearance. Satin is the best finish for cabinets in lower-traffic kitchens.
- Semi-Gloss: The most popular finish when you are considering how to paint kitchen cabinets. This finish balances look, washability, and durability. It highlights imperfections more than satin and is cleanable far more easily.
- Gloss: This finish is easier to clean and offers the highest durability. However, it shows every imperfection in the cabinet surface. The gloss finish often requires the most careful prep and application for a good look.
Best Kitchen Cabinet Primer Options
Cabinet paint primer is not an option because it provides the foundation to determine the proper topcoat adhesion and holds up over time. Skipping a cabinetry primer or considering the wrong type may lead to paint peeling off cabinets within the first year. So, choosing the right primer is as important as learning how to paint kitchen cabinets.
Bonding Primer
Bonding primers are ideally formulated to adhere to glossy, slick, or difficult surfaces where standard primers fail to work. A bonding primer is necessary for kitchen cabinets with a factory finish, especially those with a catalyzed or polyurethane coating. You should apply one coat and allow significant time to dry according to the manufacturer’s instructions while sanding lightly with 220-grit before topcoating.
Shellac-Based Primer (Zinsser BIN)
Zinsser BIN primer is the strongest stain-blocking and adhesion primer available for cabinet work. It virtually bonds to any surface, blocking tannin bleed from wood species like cherry and oak. It provides an ideal base for topcoats, and the shellac base needs denatured alcohol for cleanup. Ventilation is critical for the shellac-based primer due to a strong odor. BIN is a professional option for raw wood, cabinets with persistent bleed-through, or heavily stained surfaces.
Water-Based Primer
Water-based bonding primers such as Benjamin Moore Fresh Start or Zinsser Bulls Eye 1-2-3 are ideal for cabinets with proper cleaning and sanding. There are lower odors than shellac-based options and easily clean up with water. It is a sufficient primer for previously painted cabinets in good condition.
Steps for How to Paint Kitchen Cabinets
Most homeowners often spend 12-20 hours on an average kitchen, spread across approximately 4 to 7 days. Removing and labeling doors, cleaning surfaces perfectly, applying a compatible primer, and finishing with two thin coats of cabinet paint ensures a durable result.
Step 1: Remove Doors, Drawers, and Hardware
Remove all cabinet drawer fronts, doors, and hardware before painting anything. You should number each door and its corresponding hinge location while photographing the layout before removing anything to ensure straightforward reassembly. It’s important to remove all hinges, pulls, and knobs before focusing on how to paint kitchen cabinets.
You should also place hardware in labeled bags. Doors and drawer fronts from the cabinet provide you with easy access to all edges, ensuring a smooth horizontal paint experience. It produces a better finish than painting vertical cabinet surfaces in place.
Step 2: Clean Cabinets Thoroughly
Cleaning and preparation are critical in painting the kitchen cabinetry. It is important to remember that paint cannot adhere to dust, silicone, or grease. You should clean all surfaces with trisodium phosphate or a TSP substitute mixed with water. TSP is a professional standard for cutting through kitchen grease, which is available on every surface in an active kitchen.
It is necessary to wipe down all cabinet boxes, face frames, and the backs and fronts of all doors and drawer fronts. This approach allows surfaces to dry perfectly before proceeding. You should not skip this step because painting over kitchen grease is a common cause of peeling of painted cabinets.
Step 3: Sand Cabinets
Sanding kitchen cabinets before painting is an ideal strategy. You should sand all surfaces with 120-grit sandpaper to scuff the existing finish while creating a mechanical adhesion for the primer. This means the primer has something to grip because you are dulling the surface rather than removing the existing finish. It helps you learn how to paint kitchen cabinets with sand.
You should sand with the grain on wood surfaces. Vacuum all dust completely and wipe the surfaces with a tack cloth after sanding. Any dust left on the cabinetry surface may trap under the primer, becoming visible through the finished topcoat.
Step 4: Apply Primer
You should apply one coat of bonding primer to all surfaces with a 2-inch brush for detailed areas and edges and a 4-inch microfiber roller for flat surfaces. It’s good to work in even, thin coats without trying to achieve full coverage in one pass. You should allow the primer to dry entirely, depending on the manufacturer’s time specification, which is usually 1 to 2 hours for water-based primer and 45 minutes for shellac-based primer.
Step 5: Sand Between Coats
You may sand lightly with 220-grit sandpaper once the primer becomes completely dry before considering how to paint kitchen cabinets. It removes any dust nibs, raised grain, or imperfections in the primer coat. Now, apply thin and even coats while brushing edges and rolling flat surfaces. You should use a tack cloth to wipe all surfaces after sanding to remove dust traces before applying the kitchen cabinet paint.
Step 6: Apply First Coat of Paint
This step involves applying the first coat of the best paint for kitchen cabinets using a brush for edges and detailed areas. Moreover, you should use a microfiber roller for flat surfaces. It’s time to make sure that thin coats are leveled and cured properly. Thick paint coats sag, take longer to dry, and cannot achieve the same hardness as multiple thin coats.
You may prioritize painting the cabinet boxes and face frames before moving to the drawer fronts and doors. It’s good to keep the door horizontal on a painting rack or on sawhorses. Horizontal painting reduces the drips and brush marks on the flat door surfaces.
Step 7: Apply Second Coat
It is crucial to allow 2 to 4 hours for water-based alkyd and longer for oil-based paint to dry the first coat completely before applying the second coat. You should apply the second coat after light sanding between coats and wiping with a tack cloth. That’s why coating is helpful in how to paint kitchen cabinets.
Most cabinetry surfaces often require two coats of paint over a properly primed surface. A third coat is only required in high-contrast color changes, like when the first two coats show thin spots or when painting dark cabinets white.
Step 8: Cure Time and Reassembly
Cabinet paint often reaches full hardness in a timeframe of 14 to 30 days. The paint is usable before then, but it may be vulnerable to dings. You should allow at least 24 to 48 hours for doors and drawer fronts to dry before rehanging.
It’s always good to rehang doors using the numbered photos as a reference and reinstall hardware. You should avoid stacking items in cabinets or closing drawers tightly against the frame for a minimum of 2 weeks while the paint is still curing.
Need a Professional Team to Handle Every Step?
Kitchen Remodel Bellevue WA removes every door, primes every surface, and applies a factory-smooth spray finish while you go about your week. No sanding, no fumes, no 5-day project.
Licensed in-house team with relaible workmanship to handle every painting step.
Request Cabinet Painting Call: (425) 696-7060How to Paint Wood Kitchen Cabinets
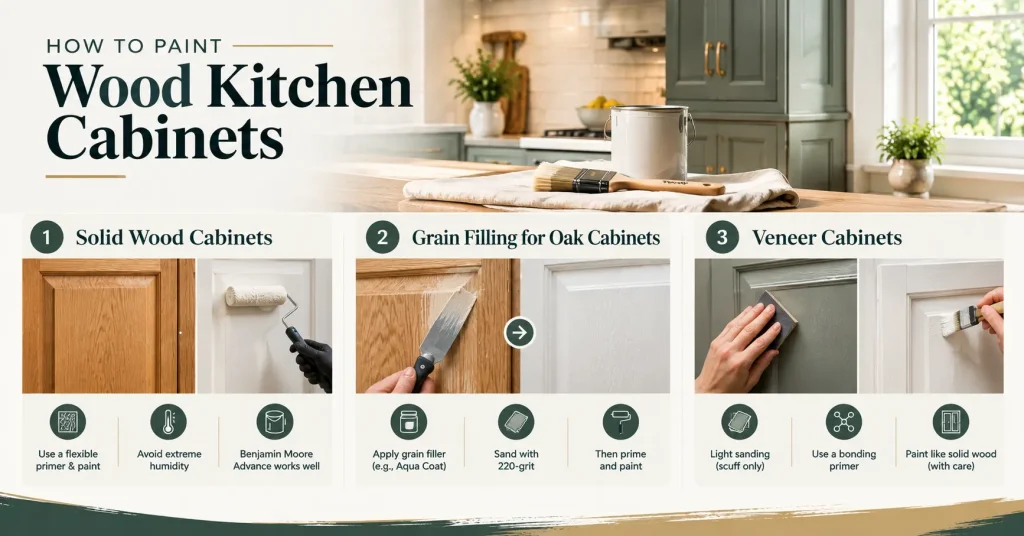
Wood cabinets made from solid maple, birch, cherry, or oak are a common cabinet type in Bellevue kitchens. These cabinets respond ideally to proper prep. Grain is the fundamental challenge for wood-made cabinets. Moreover, open-grained species like oak show the grain texture due to improper paint. Here is how to paint kitchen cabinets.
Solid Wood Cabinets
Solid wood expands and contracts with humidity changes in the Pacific Northwest. You can use a flexible primer and paint system specified for wood movement. Moreover, it is better to avoid applying paint in extremely high or low humidity conditions. Benjamin Moore Advance is ideal for handling wood movement without cracking.
Grain Filling for Oak Cabinets
Oak consists of a unique open grain that telegraphs through paint, offering a textured surface even after multiple coats. You can apply a grain filler like Aqua Coat Clear Grain Filler before priming for a grain-free, smooth finish on oak cabinets. Grain filler application is possible with a putty knife or spreader, allowing dry time, then being sanded flush with 220-grit, and proceeding with primer. It adds 1-2 days to the project timeline but provides a smoother finished surface.
Veneer Cabinets
Veneer cabinetry consists of a thin wood layer over MDF or polywood substrate. These cabinets are also painted similarly to solid wood but need careful sanding. You may sand lightly enough to scuff the surface without cutting through the veneer. A bonding primer is especially crucial for veneer, as the surface may become tricky for standard primer adhesion.
How to Paint Kitchen Cabinets Without Sanding
A no-sand approach with crucial limitations is available for homeowners who are looking to avoid both the time and mess of sanding. This method relies on the bonding primer and liquid deglosser to achieve the adhesion that sand may provide mechanically.
When No-Sand Works
The no-sand method is effective on cabinets with a factory-applied finish in good condition without previous DIY paint jobs, deep scratches, and peeling. This approach works best on smooth laminate and MDF cabinet surfaces. However, it is less reliable on natural wood with heavy grain or highly glossy factory finishes.
How to Use Liquid Deglosser
Liquid deglosser (liquid sandpaper) chemically etches the existing finish to create a surface that paint and primer can bond to. You may apply it with a clean cloth to work in sections. The surface often feels slightly tacky after application. It’s important to follow the manufacturer’s instructions for flashing off entirely before applying primer.
Step-by-Step No-Sand Process
Here is a process for how to paint kitchen cabinets with no sand:
- Clean all surfaces entirely with TSP when skipping sanding.
- Apply liquid deglosser to all surfaces and wipe off smoothly.
- Apply a water-based or Zinsser BIN bonding primer.
- Allow the primer to dry fully.
- Apply two thin coats of cabinet-grade paint and allow dry time between coats.
Limitations of the No-Sand Method
The no-sand method is less durable than a properly sanded surface. You should apply paint without sanding, which is more likely to chip or peel over time on high-use cabinets around the sink, near the stove, or on frequently touched door edges. However, sanding remains the professional option for the most durable result.
How to Paint Laminate and MDF Kitchen Cabinets
MDF and laminate cabinet surfaces present specific challenges for paint adhesion. Both types have non-porous surfaces that standard primers struggle to grip. Moreover, an MDF cabinet has additional vulnerability to moisture at edges and end grain. Here is how to paint kitchen cabinets made from Medium-Density Fibreboard (MDF) and laminate.
Painting Laminate Kitchen Cabinets
Laminate is the most adhesion-resistant cabinet surface. Zinsser BIN shellac-based primer is the most reliable, high-quality bonding primer for laminate. You should not sand laminate aggressively and should focus on light scuffing with a sufficient 220-grit. It is possible that heavy sanding may damage or cut through the laminate surface. You should apply bonding primer and allow it to cure fully while topcoating with a water-based alkyd cabinet paint.
Painting MDF Kitchen Cabinets
MDF paints well on face surfaces but has two specific vulnerabilities. Edges absorb primer and paint heavily. That’s why you should apply two coats of primer to all edges before painting faces to avoid uneven absorption. End grain on MDF must be sealed before priming, using a dedicated MDF sealer or an extra coat of shellac-based primer. You should avoid getting MDF surfaces wet during cleaning. It is recommended to use a slightly damp cloth rather than saturating the surface because MDF swells and degrades when exposed to excessive moisture.
Raised Grain on MDF
Water-based primers may raise the grain of MDF, providing a rough texture after the first coat dries. You may use 220-grit sandpaper to sand lightly after the primer dries to smooth the raised grain before applying topcoat. Professionals also use a shellac-based primer to avoid the problem because shellac does not raise the grain of MDF. This is how to paint kitchen cabinets with raised grain on MDF.
Brush vs Roller vs Sprayer: Which is Best?
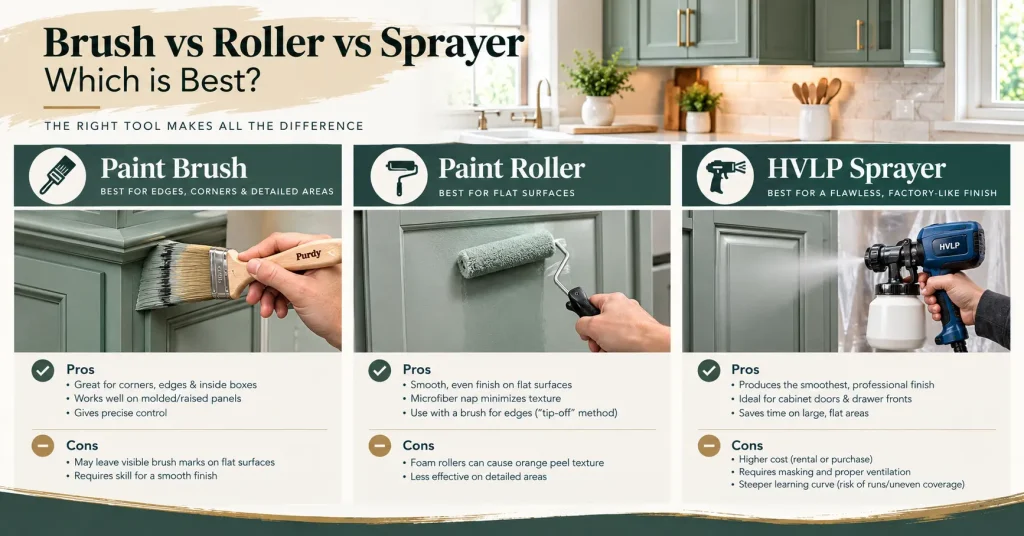
Choosing the best tool for kitchen cabinet paints depends on specific project needs, budget, and desired finish. The application method determines the final appearance of your painted cabinets more than any other variable after paint selection. Let’s explore kitchen cabinet paint brush vs roller vs sprayer.
Paint Brush
A high-quality brush like Wooster Shortcut or Purdy XL is the ideal option for corners, edges, and inside cabinet boxes, and molded or raised-panel doors. A kitchen cabinet paint brush may leave visible stroke marks on flat surfaces if used without a very skilled technique and a self-leveling paint. Moreover, a brush alone on flat surfaces may produce a visibly brushed finish for most DIY painters.
Paint Roller
A 4-inch microfiber roller on flat cabinet door surfaces produces a significantly smoother result than a brush. The microfiber nap releases paint evenly and minimizes texture. You should use a brush to cut in edges and corners, then immediately roll the flat areas. This “tip-off” approach produces the best brush-and-roller result. It is better to avoid foam rollers for how to paint kitchen cabinets because they can lead to a fine orange peel texture.
HVLP Paint Sprayer
An HVLP (high-volume, low-pressure) sprayer produces the smoothest possible finish that may resemble a factory spray result. Renting a pro-grade paint sprayer may cost over $100 per day. Moreover, buying the essential high-adhesion primers and cleaning agents may add another $150 to $200.
Spraying may require significant masking of surrounding areas and proper ventilation. However, the learning curve may result in runs and uneven coverage for first-time users. Experienced individuals may consider an HVLP sprayer the best tool for cabinet doors and drawer fronts.
How Much Does It Cost to Paint Kitchen Cabinets?
The cost of painting kitchen cabinetry may vary depending on the type of finish, size of the kitchen, cabinet material, pre-existing condition, and type of painting. That’s why it is important for homeowners to understand the cost breakdown for painting kitchen cabinets. Understanding expenses helps you decide how to paint kitchen cabinets.
How Much Does DIY Cabinet Painting Cost?
You should consider a budget of $250 to $600 for basic tools and materials, excluding major repairs or optional sprayers. It is recommended to add $100 to $150 per day when you are renting an HVLP sprayer.
| Item | Approximate Cost |
| Cabinet-grade paint (2 gallons) | $80 to $140 |
| Bonding primer (1 gallon) | $30 to $60 |
| Brushes and rollers | $30 to $60 |
| Sandpaper (various grits) | $15 to $25 |
| TSP cleaner | $10 to $20 |
| Painter’s tape and drop cloths | $20 to $40 |
| Tack cloths | $5 to $10 |
| Total DIY Materials | $190 to $355 |
How Much Does Professional Cabinet Painting Cost?
The cost of professional painting for cabinets is approximately $1,000 to $12,000 for a high-end, large kitchen. Painting pricing may vary depending on the number of drawer fronts and doors, cabinet condition and required prep, specific paint product, application method, and number of coats.
Professional cabinet painting may cost $4,000 to $7,500 for a full kitchen in Bellevue, WA, reflecting the Eastside’s labor market. A professional, sprayed finish that may last for 8 to 10 years with proper care is more visually appealing and durable than most DIY results.
Kitchen Cabinet Paint Cost Comparison Table
Let’s explore how to paint kitchen cabinets depending on DIY or professional approach.
| Method | Cost | Timeline | Durability |
| DIY with brush and roller | $200 to $400 | 4 to 7 Days | 3 to 5 Years |
| DIY with HVLP sprayer | $350 to $650 | 4 to 7 Days | 5 to 7 Years |
| Professional spray finish | $4,000 to $7,500 | 3 to 5 Days | 8 to 10 Years |
| Cabinet replacement | $15,000 to $35,000 | 3 to 6 Weeks | 20+ Years |
This is how much to paint kitchen cabinets through DIY and professional painting.
Is Professional Painting Worth It in Bellevue, WA?
Professional cabinet painting is worth the investment for Bellevue homeowners who prefer a genuine result or are preparing for sale. The difference between a DIY brush-and-roll and spray-finished professional job with cabinet customization is apparent up close to the buyer’s eye. Kitchen Remodel Bellevue WA offers reliable cabinet painting as a standalone service with reliable workmanship.
Get an Exact Cabinet Painting Quote for Your Bellevue Kitchen
Professional cabinet painting in Bellevue costs differently depending on the kitchen size with a spray finish that lasts 8 to 10 years. Every quote is itemized, transparent, and delivered within 48 hours.
No bundled numbers, no hidden fees, and no obligation to proceed.
Request a Painting Quote Call: (425) 696-7060What are the Best Kitchen Cabinet Paint Colors for 2026?
The paint colors for kitchen cabinets mainly focus on moody dark, earthy green, and warm neutral tones with a satin or matte finish. These modern cabinetry color trends often blend contrast and warmth. It’s important to understand colors for how to paint kitchen cabinets.
Warm Whites
Warm whites from Sherwin-Williams Alabaster and Benjamin Moore White Dove are default trending colors to provide versatile and soft warmth. White Dove (OC-17) has a creamy, warm undertone that is known as modern and fresh without the stark coldness of pure white. Alabaster (SW 7008) is slightly warmer and works especially well in kitchens with warm countertop materials or natural wood elements.
Greens and Sage
The 2026 palette has moved away from all-gray and all-white toward heritage hues. It includes Sage Green on lower cabinets, Provençal blue, warm terracotta, and warm neutrals like Warm Linen and Oatmeal. Sage green lower cabinets are usually paired with off-white or white uppers. This is a dominant two-tone combination in Bellevue kitchen renovations this year.
Navy and Deep Blues
Deep navy blue, such as Sherwin-Williams Naval and Benjamin Moore Hale Navy, is an ideal option for the kitchen lower cabinet banks and islands. It has become the perfect choice for kitchens with light stone countertops and gold or brass hardware. So, you can choose this color for how to paint kitchen cabinets.
Two-Tone Kitchens
Soft neutrals and warm whites paired with black or brass hardware are popular. They brighten kitchens without giving a harsh feeling. Two-tone kitchens, lighter uppers and darker lowers, are the most popular renovation options for Bellevue homeowners. It offers a visual appeal without committing to a fully dark kitchen.
Dark and Bold Lowers
Rich navy, dark green, and charcoal on lower cabinets provide the visual weight and drama to anchor the kitchen. This kitchen appearance may work particularly well in open-concept kitchens where the island may contain a different color from the perimeter cabinets.
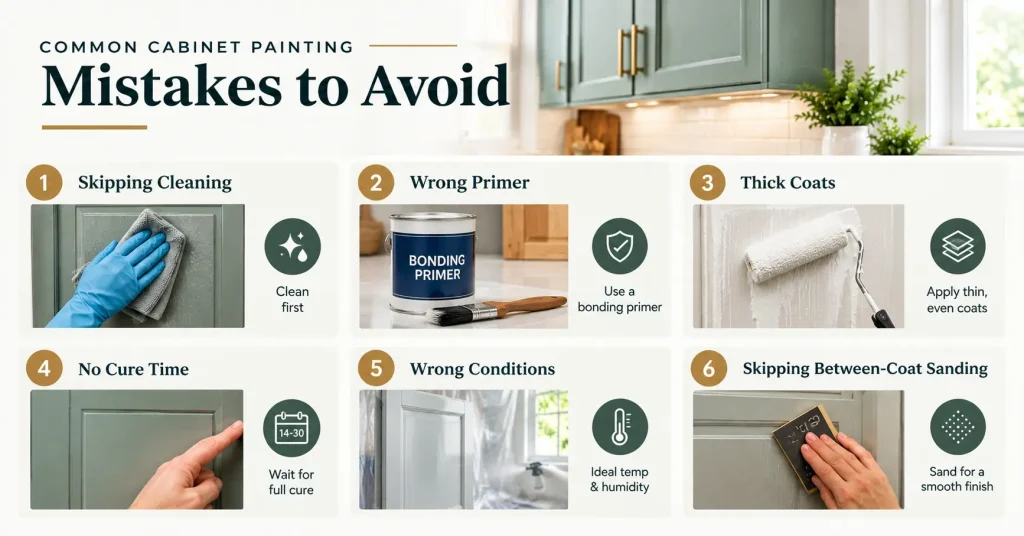
What are Common Cabinet Painting Mistakes to Avoid?
Painting kitchen cabinetry may look like a simple upgrade, yet this process often demands far more precision than most homeowners’ expectations. Cabinets face constant touching, cooking residue, moisture, and daily wear that may quickly expose the paint. That’s why small mistakes often lead to staining, chipping, or peeling. You should avoid these mistakes for how to paint kitchen cabinets.
Skipping the Cleaning Step
The most common and most damaging mistake. The kitchen grease may remain invisible in normal light, which prevents paint and primer from bonding. Use a TSP for cleaning before starting any other prep step.
Using the Wrong Primer
A standard wall paint primer may not provide adequate adhesion on cabinet surfaces. It is always recommended to use a dedicated bonding primer for painting appropriate for your kitchen cabinet material.
Applying Thick Coats
It is important to remember that thick coats sag and take far longer to cure properly, preventing you from achieving the same hardness as multiple thin coats. You should apply thin, even coats and allow full dry time between each. So, this is how to paint kitchen cabinets with thick coats may cause issues.
Allowing No Cure Time
Cabinet paint often reaches full hardness at 14-30 days. It may be vulnerable to dings even though it is usable before then. Cleaning aggressively, loading shelves too fast, or closing cabinet doors too soon before the paint has fully cured may cause permanent damage to the finish.
Painting in Wrong Conditions
Painting cabinets above 90°F or below 50°F, or in high humidity, may cause incorrect paint curing. It can result in uneven, tacky, or soft finishes. You should paint in a temperature-controlled environment.
Skipping Between-Coat Sanding
Each coat of paint and primer may raise dust nibs and minor imperfections. Sanding between coats with 220-grit may produce a smooth surface, and skipping this step may lead to a noticeably rough final finish.
DIY vs Professional Cabinet Painting: Which Should You Choose?
Choosing between DIY and professional kitchen cabinet painting depends on time, budget, and your preferences for finish durability. The quality of painting is also an influencing factor in choosing the right option for your kitchen. Let’s learn how to paint kitchen cabinets may vary for DIY and professional applications.
When DIY Cabinet Painting is a Good Option
DIY painting makes sense when you are looking for how to paint small kitchen cabinets with fewer than 20 doors and drawer fronts. It is an ideal option when the existing cabinet condition is good, requires minimal prep, you have adequate time (5-7 days), and you have a limited budget.
A DIY result is an excellent option when you have used the right materials with thorough prep. The application quality is a primary limitation because a DIY brush-and-roll finish always shows more texture than a professional spray application. It may offer ideal durability through a long-lasting, harder finish.
When to Hire a Professional Cabinet Painter
Hiring a professional is a good choice when you are looking for a factory-smooth spray finish, and the kitchen is large with several cabinet doors. You should get help from a professional painter when the existing cabinet condition requires significant prep work beyond basic cleaning and sanding, and when painting for resale under buyer scrutiny. This is how to paint kitchen cabinets professionally to get the best results.
What Professional Painters Do Differently
Professional cabinet painters in Bellevue remove all doors and paint them off-site in a spray booth. Their painting approach produces a factory-quality, dust-free finish that is impossible to replicate in a residential kitchen. They often use two-component catalyzed coatings for maximum hardness while sanding between every coat with precision.
The resulting finish of the cabinetry paint may last for 8-10 years under normal kitchen use, which is two to three times the lifetime of a typical DIY painting result. Kitchen Remodel Bellevue WA provides professional cabinet painting as a standalone service for Bellevue homeowners looking for a higher level of quality.
Ready for Painted Cabinets That Actually Last in Bellevue?
Kitchen Remodel Bellevue WA uses professional spray equipment, cabinet-grade coatings, and a proven process that delivers a lasting finish.
Get an in-home estimate for kitchen cabinet paiting today.
Get Help from Kitchen Remodel Bellevue WA If You Don’t Know How to Paint Kitchen Cabinets
Painting cabinetry is affordable and the most impactful kitchen upgrade available to Bellevue homeowners. The difference between a paint job that lasts 18 months and 8 years is the preparation that includes the right primer, thorough cleaning, quality materials, thin coats, and proper cure time. Contact us today if you need help with how to paint kitchen cabinets!
Answers to Frequently Asked Questions About How to Paint Kitchen Cabinets
Common questions about painting kitchen cabinetry are answered here.
Can I just paint over my kitchen cabinets?
No, you cannot paint over your kitchen cabinets without proper preparation. Skipping the preparation may also lead to quick chipping, peeling, and scratching of paint on cabinetry. You may face issues when you consider how to paint kitchen cabinets randomly.
What not to do when painting kitchen cabinets?
Avoid skipping degreasing and deep cleaning, leaving doors attached, forgetting primer, applying thick coats, and rushing dry times when you focus on how to paint kitchen cabinets.
Is it better to brush or roll paint on cabinets?
It is better to use a combination of both a roller and a brush to get the best results for kitchen cabinetry painting. A brush is ideal for edges, crevices, and corners. A roller works well for large and flat surfaces.
Which cabinets cannot be painted?
Cabinets made from non-porous materials such as stainless steel, vinyl, laminate, and thermofoil often cannot be painted successfully without using specialized industrial primers. You may get our help for how to paint kitchen cabinets made from non-porous materials.
What kind of paint do I use for my kitchen cabinets?
You may use water-based urethane alkyd enamel or waterborne alkyd paint such as Benjamin Moore Advance or Sherwin-Williams Emerald Urethane Trim Enamel for your kitchen cabinets.
What do professional painters use to paint cabinets?
Professional painters use self-leveling conversion varnishes, high-solids, durable water-based urethane alkyd enamels, or water-based 2K (two-component) polyurethanes to paint kitchen cabinets.